
There are many SAML-compliant identity providers (IdPs) available, each with its own unique setup process. This guide will give you a general overview of how to connect a SAML source to Edlink but if you have trouble with your specific provider, please reach out to Edlink support for assistance.
Step 1: Create an Application in Your Identity Provider
Create an application in your identity provider's dashboard. This process will vary depending on the provider you are using.
When doing this you will be asked for the Supplying Party's (SP) Assertion Consumer Service (ACS) URL and Metadata. You will find these values in the first step of the onboarding when connecting SAML.
Step 2: Enter your Metadata
The next step of the onboarding will ask you to enter your Identity Provider's (IdP) Metadata. This is usually provided as a URL or XML file by your identity provider. Both options are available in the onboarding.
Well Done!
You're finished! SSO through your IdP should now be functional.
ADFS Specific Config
There are a couple additional steps needed when using ADFS as your identity provider.
Disabling Assertion Encryption
ADFS will attempt to sign Assertions by default. Please disable this for the Edlink application in ADFS. You can do this two ways:
- In the ADFS Management Console:
- Navigate to the Relying Party Trusts section.
- Right-click on the Edlink application and select "Properties."
- Go to the "Encryption" tab
- Click Remove to remove the encryption certificate.
- Click OK to save the changes.
- Using PowerShell:
- Open PowerShell with administrative privileges.
- Run the following command to remove the encryption certificate for the Edlink application:
Set-AdfsRelyingPartyTrust -TargetName "the name you used goes here" -EncryptionCertificate $null
Additionally, ensure that the certificate is not fetched again by disabling monitoring:
Set-AdfsRelyingPartyTrust -TargetName "the name you used goes here" -MonitorEnabled $false
Configuring Claim Rules
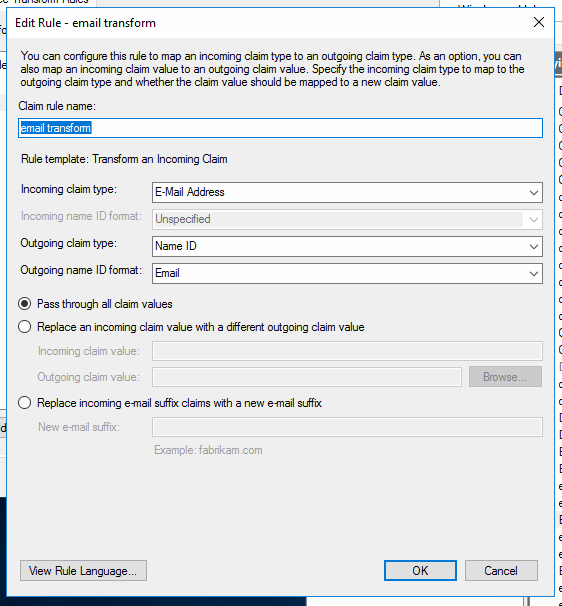
You will need to create claim rules to send the appropriate attributes to Edlink. At a minimum, you will need to send email.
You will need to create a claim transform rule for email. Here is an image of the config you need:
Azure AD Specific Config
When using Azure AD as your identity provider, you will need to download the SAML metadata from Azure and upload it to Edlink during the onboarding process. You are looking for the Federation Metadata XML link in the Azure portal.
This image shows where to find the metadata in the Azure portal:
