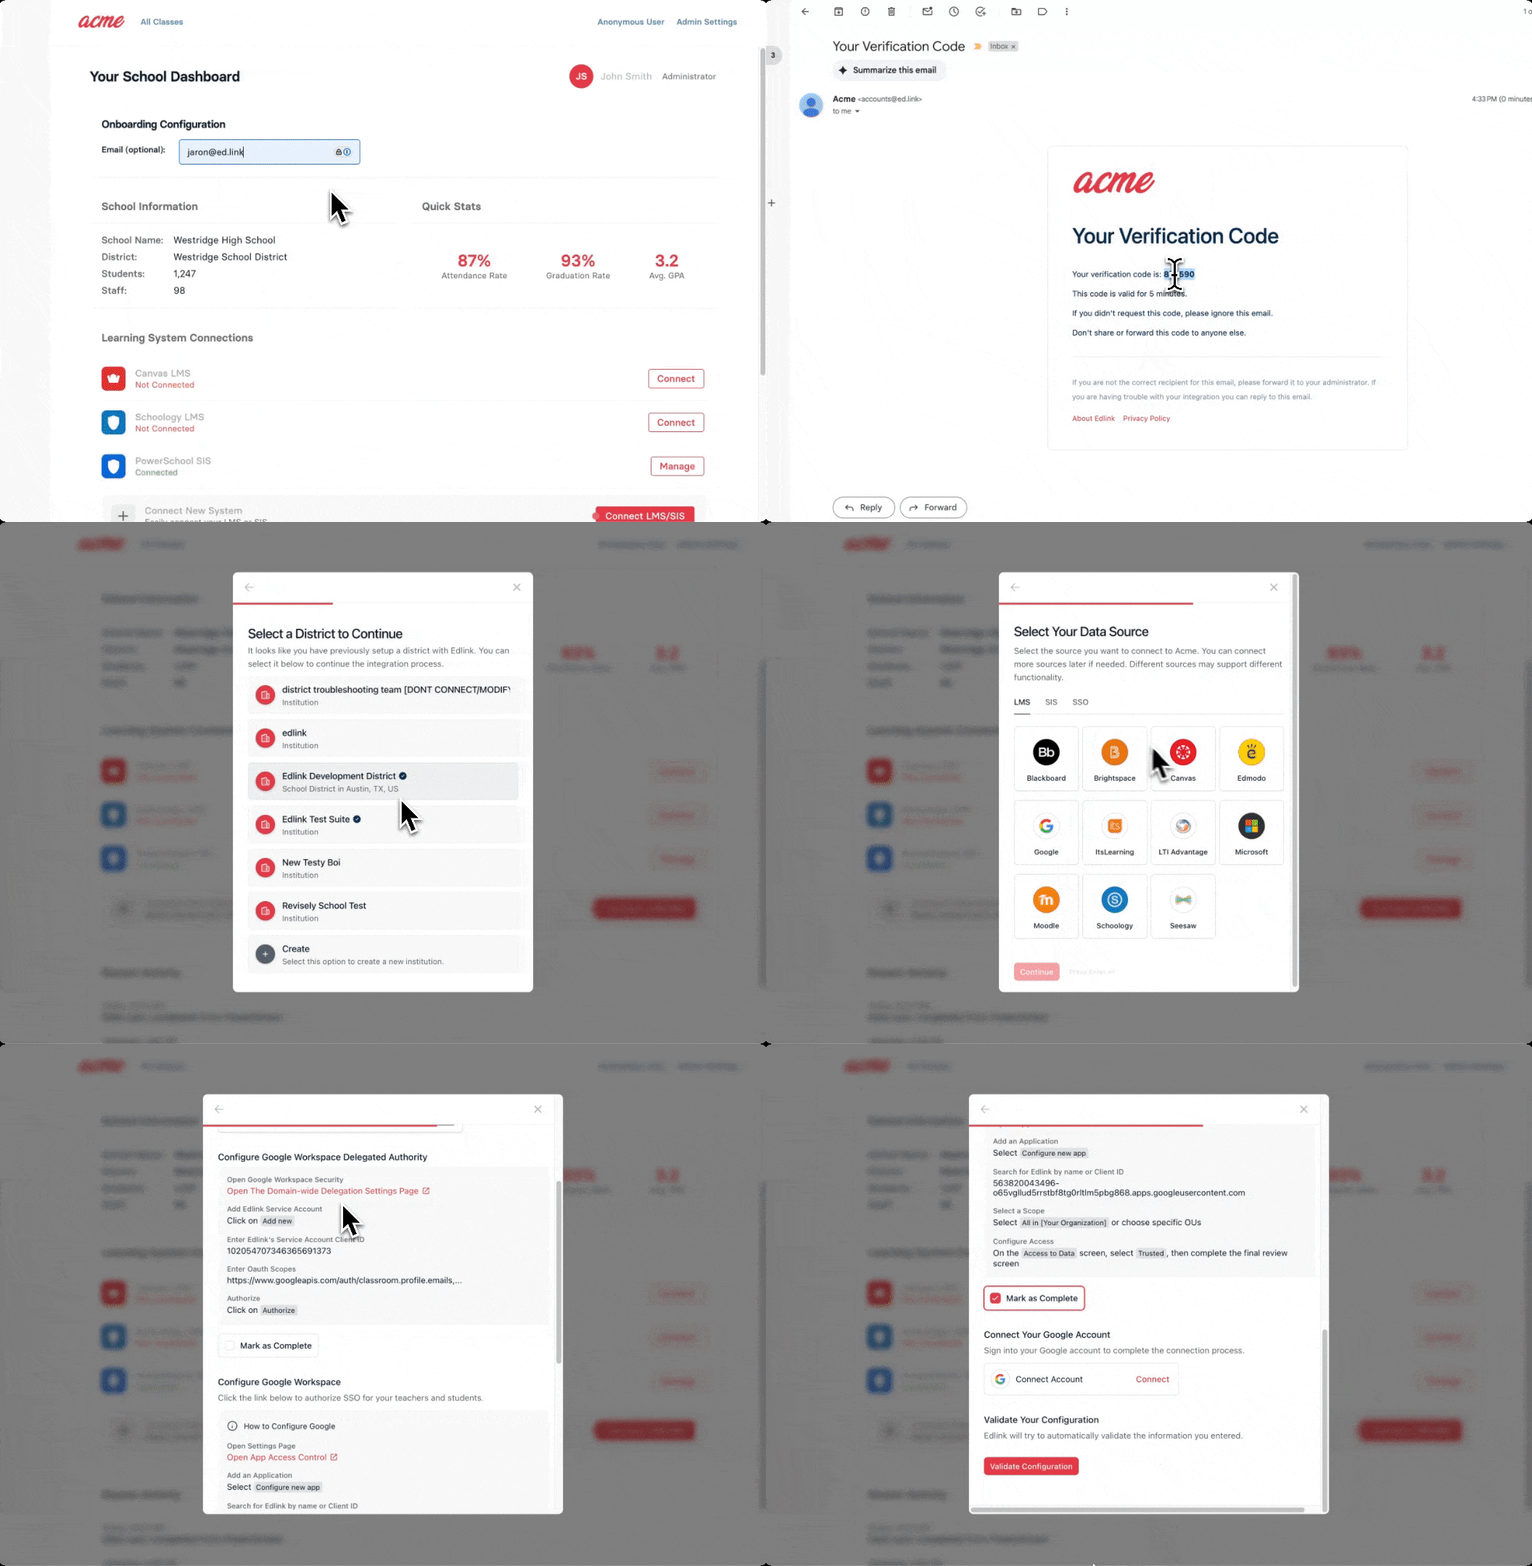
Embedded Onboarding
Edlink's embedded onboarding allows you to integrate the Edlink onboarding experience directly into your application, providing a seamless connection flow for educational systems like Canvas, Schoology, PowerSchool, and others.
This guide explains how to implement and use Edlink's embedded onboarding flow within your application.

Usage
1. Install the Edlink Widgets SDK
Add this script tag to your HTML to "install" the Edlink Widgets SDK:
<script src="https://ed.link/widgets/edlink.js"></script>
2. Initialize the Edlink Client
First, initialize the Edlink SDK with your client ID:
this.edlink = new Edlink({
    client_id: 'YOUR_APPLICATION_ID'
});
3. Create an Onboarding Instance
Create an onboarding instance with configuration options:
const options = {
    // Optional: Specify a provider to pre-select it
    provider: 'canvas', // Examples: 'canvas', 'schoology', etc.

    // Optional: Customize the theme
    theme: {
        primary_color: '#e63946' // Your brand color
    },

    // Optional: Tell Edlink the user's email; this creates a better user experience
    email: 'user@example.com',

    // Optional: Handle errors
    onError: (error) => {
        console.error('Onboarding error:', error);
        // Handle the error, e.g., show a message to the user
    },

    // Optional: Handle successful completion
    onSuccess: (data) => {
        console.log('Onboarding success:', data);
        // Handle the success, e.g., update UI to show connected status
    }
};

const onboarding = this.edlink.createOnboarding(options);
4. Listen for Events
Set up event listeners for user interactions:
// Optional: Listen for when user cancels
onboarding.on('integrate.cancel', () => {
    console.log('Onboarding cancelled by user');
    // Handle cancellation
});

// Optional: Listen for when onboarding is closed
onboarding.on('integrate.close', () => {
    console.log('Onboarding closed');
    // Handle close event
});

// Optional: Listen for errors
onboarding.on('integrate.error', (error) => {
    console.error('Onboarding error:', error);
    // Handle error
});

// Optional: Listen for successful integration
onboarding.on('integrate.success', (data) => {
    console.log('Integration successful:', data);
    // Handle successful integration
});
5. Show the Onboarding Flow
Display the onboarding modal:
onboarding.show();
6. Clean Up Resources
When your component is unmounted or the onboarding flow is no longer needed:
// In the component's destroyed/unmounted lifecycle hook
if (onboarding !== null && onboarding !== undefined) {
    onboarding.destroy();
}
Configuration Options
| Option | Type | Description |
|---|---|---|
theme.primary_color | String | Optional. Custom brand color in hex format |
email | String | Optional. Pre-fill user's email address for the onboarding flow |
provider | String | Optional. Pre-select a specific provider (e.g., 'canvas', 'schoology') |
onboarding_id | String | Optional. Load a custom onboarding |
onError | Function | Optional. Callback when an error occurs during onboarding |
onSuccess | Function | Optional. Callback when onboarding completes successfully |
IS_DRY_RUN | Boolean | Optional. If true simulates an onboarding |
Events
| Event | Description |
|---|---|
integrate.cancel | Triggered when the user cancels the onboarding process |
integrate.close | Triggered when the onboarding modal is closed |
integrate.error | Triggered when an error occurs during the onboarding process |
integrate.success | Triggered when the onboarding process completes successfully |
Providers
You can get a list of supported providers by calling the /api/v1/providers endpoint. This will return a list of available providers that can be used in the onboarding process.
The application value is what you should use for the provider parameter when creating the onboarding instance.
Example Implementation
Here's a complete example of implementing embedded onboarding in a Vue component:
export default {
    name: 'MyOnboardingComponent',
    data() {
        return {
            edlink: null,
            onboarding: null
        };
    },
    mounted() {
        this.edlink = new Edlink({
            client_id: 'YOUR_CLIENT_ID'
        });
    },
    destroyed() {
        if (this.onboarding) {
            this.onboarding.destroy();
        }
    },
    methods: {
        createOnboarding() {
            const options = {
                theme: {
                    primary_color: '#e63946'
                },
                email: this.state.user.email
            };

            this.onboarding = this.edlink.createOnboarding(options);

            this.onboarding.on('integrate.success', (data) => {
                // Handle successful integration
            });

            this.onboarding.on('integrate.error', (error) => {
                // Show error message to user or error page
                // Offer retry options
            });

            this.onboarding.on('integrate.cancel', () => {
                // User cancelled the onboarding
            });

            this.onboarding.on('integrate.close', () => {
                // Onboarding modal closed after completion
            });

            this.onboarding.show();
        }
    }
};
Best Practices
- Error Handling: Always implement proper error handling in the
onErrorcallback or via events to provide feedback to users when something goes wrong. - Resource Cleanup: Call
destroy()when the onboarding component is no longer needed to prevent excess resource usage. - Responsive Design: Ensure there is enough height and width for the onboarding modal when your application is used at its smallest sizes.
- User Experience: Consider pre-filling the email field when the user's information is already known to reduce friction. This can skip the login step for users who have already authenticated with Edlink.
- Custom Styling: Use the
themeoption to match the onboarding flow to your brand colors for a consistent user experience.
